_edited.jpg)
BOBO 2.2 Desktop Companion With Web Controller
- Marzooqe Moideen
- Jan 23
- 2 min read

Have you ever looked at a microcontroller project and wished it felt a little more... alive?

Welcome to BOBO 2.2. This isn't just another display project; it’s an advanced personality engine designed for ESP32-based robots. We’ve transformed a static OLED screen into a living, breathing character with simulated physics, distinct moods, and real-time environmental awareness.
Whether you are a student, a hobbyist, or just someone who wants a cute companion on their desk, this guide will walk you through building your very own BOBO.
What Can BOBO 2.2 Do?
BOBO 2.2 is packed with features that make him more than just a toy:
👀 Ultra Pro Physics Engine: Realistic eye movements, blinking, and "breathing" pupil dilation.
🎭 9 Distinct Moods: From Happy and Excited to Suspicious and Angry.
☁️ Smart Weather Station: Displays real-time temperature, humidity, and a 3-Day Forecast.
🌍 World Clock: Tracks two separate time zones simultaneously.
🎛️ Web Control Center: A dedicated dashboard to control the robot via USB (Web Serial).
Part 1: The Hardware
The build is surprisingly simple and affordable. Here is everything you need to get started.
Components List:
Microcontroller: ESP32 C3 SuperMini Development Board
Display: 0.96" I2C OLED Display (SSD1306 driver)
Input: TTP223 Capacitive Touch Sensor
Power/Data: Micro-USB Cable
Wiring Guide
Connection is straightforward. We use the I2C protocol for the display and a single digital pin for the touch sensor.
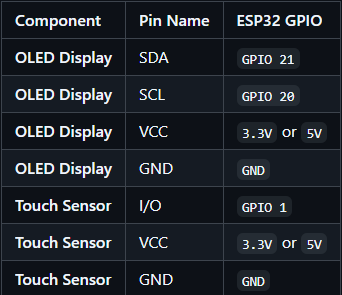
(Pro Tip: Both the OLED and Touch Sensor can run on 3.3V or 5V)

Part 2: Software Installation
We’ve made the software setup as easy as possible using the Arduino IDE.
Step 1: Board Setup
Install the Arduino IDE.
Add the ESP32 URL to your "Additional Boards Manager URLs" in Preferences.
Install the "esp32 by Espressif Systems" board package.
Step 2: Install Libraries Search for and install these three libraries in the Library Manager:
Adafruit GFX Library
Adafruit SSD1306
Arduino_JSON
Step 3: Upload the Code
Download the project files from git hub: https://github.com/micromakerlabsfiles-git/BOBO_Web_Controller , open BOBO_96_Web_Control.ino.
Select MakerGO ESP32 C3 SuperMini as your board, and hit upload!
Step 4: API Generation For Getting Weather Data
To enable weather features, you need a free API Key from OpenWeatherMap.
Go to https://openweathermap.org/ and create a free account.
Click your username (top right) and select My API keys.
Create a new key named "BOBO".
Copy the key (e.g., a1b2c3d4e5...).
Note: It may take 10–60 minutes for a newly generated key to become active on their servers.
Part 3: The Web Control Center
This is where BOBO truly shines. You don't need to re-upload code to change settings.
Open BOBO_Web_Controller in Chrome, Edge, or Opera (Firefox is not supported).
We’ve built a Web Control Center that runs right in your browser (Chrome, Edge, or Opera).
With the Web Controller, you can:
Set WiFi & Weather: Enter your City Name and OpenWeatherMap API key.
Adjust Physics: Change eye size, roundness, and position using sliders.
Live Control: Force BOBO into different moods or switch screens instantly.
Get Started Today
Ready to build your own? You can download all the necessary code and 3D print files from the link below.

Nice setup